Think this whole file needs to be reorganized. It is to much of a a normal documentation where every choice in the wizard is explained, even if the example is not using it. I would like to see the file split into several files with an example per file. The examples should have a described scenario and then the path to accomplish the solution. Only the path should be described in the example, not everything that could have been used. tofuse 2013-09-19
In this series of examples we will show you how to design and implement some Custom Fields into IFS Applications.
Our scenario is that this customer using IFS Applications wants to add a new
attribute called Color to LU SalesPart. It is very important for this customer
to be able to see which color a specific SalesPart has on a CustomerOrderLine.
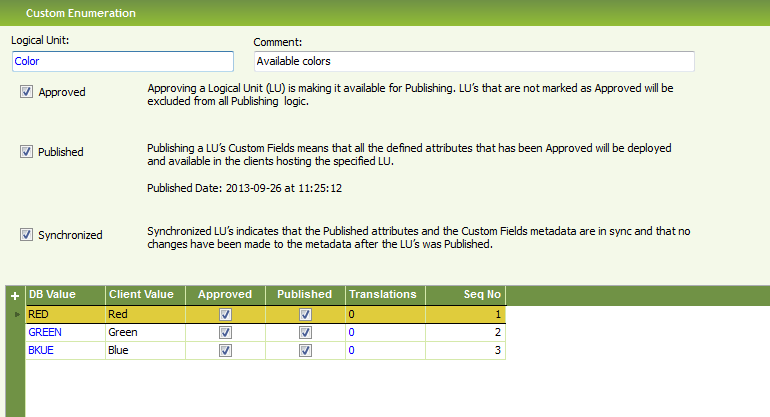
The Color field is an enumeration of values (White, Black, Red and Blue). The
Color field must be displayed as read-only on a CustomerOrderLine so that the
end-users can see what Colors they have ordered. They also want to add a
read-only field called Market Code to LU CustomerOrder (this
field exists on the LU SalesMarket through LU CustOrdCustomer). At last they
want to add an already existing attribute VAT on CustomerOrder. Below you can
see how to design and deploy all these examples.
As an example of a persistent Custom Field we will add the attribute Color to
SalesPart. Color is a Custom Enumeration
that you need to create before you create your attribute.
First you must choose that Color should be a Persistent field.
Then you must give a name to the attribute, COLOR in this case. This generates a column called CF$_COLOR in the Custom Fields table and views.
Prompt is displayed as the label on the forms where you choose to show the COLOR Custom Field. The prompt can be translated so it is displayed differently dependent of which language you use. The value you enter here is the fallback value if no translations exist.
Add your own comments about the field and what it is intended to be used as. This field is not displayed anywhere yet.

On this step you choose which data type your Custom Field is. At the same time you choose what format the field should have when displayed in your forms. In this case, since you know that COLOR is an Enumeration. For COLOR you should choose Normal enumeration.

You must choose which Enumeration this field is connected to. In this case you connect it to the Color enumeration.

If you check Insertable then you can enter a value in the field COLOR when you create a new record.
If the attribute is Insertable you can choose a default value from the enumeration. You will then get this value populated when you create a new record.
If you check Updateable, then you can change the value after you have populated the record.
If you check Searchable then you can perform queries with conditions on this attribute, e.g. in the Search Dialog.
If you check the LOV property you can see this attribute in the LOV dialogs.
Checking Indexed means that an index is created when you Publish this attribute.

If set to public we generate a method (Get_xxx method) that can be used to get the value from the attribute.
If checked this attribute will be considered when generating code when published.
This is a read-only property that shows whether an attribute is published or not.

Now we should build 3 read-only fields for LU CustomerOrder. These three read-only fields are showing the same attribute but the value is fetched in different ways. You start to create a read-only field by choosing read-only and give the field a name. The field we want to display is the Description of the Sales Market, we will call this field Market_Code.
When you add a field by following references you choose Implementation Type Reference. Then we name this field Market_Code.
The top node is the LU from which you start. The nodes below the top node represents referenced LU’s. Finally you have attributes that you can choose to retrieve the value from.
Make sure that you follow the correct references. You stop following references by choosing an attribute on a specific LU. The more references you have followed the more impact on performance this Custom Field will have where displayed. In this case you choose description within LU SalesMarket, since we want to display the description of the market this customer belongs to.
The result should be like this. This metadata is used to create a function
that is used in the Custom Fields view to display the value.
The function and
its code can be shown in the database.

Now we will try to build the same thing by using existing methods in IFS Applications. This requires a lot more knowledge about IFS Applications but you can get better results by using already built functions. You start exactly as you did with a reference. Then you select Expression instead of reference. Then we name this field Market_Code2.
The expression should look like this:
Sales_Market_API.Get_Description(Cust_Ord_Customer_Api.Get_Market_Code(v.customer_no))

If you are using an expression to display your value you must be sure that all
used methods in your expression is granted to your end-users or make sure that
you only uses read-only methods. If you want to avoid this problem you can check
the Guarantee read-only flag. If this flag is checked we will generate a new
read only function for you, this in turn means that you don’t need to consider
any security checks since this is done by the system now. Checking he Guarantee
read-only flag leads to performance overhead.
The third alternative Select Statement requires even more knowledge about IFS Applications. Here you need to be able to write a correct Select statement that returns the correct value. You start as you did with a reference. Then you choose Select and write your select statement. Then we name this field Market_Code3.
In this step you also must provide the method signature with the parameters the select statement requires. Your parameters are the same as the bind variables you use in your select statement. Bind variables is the variables that start with a colon “:”, :customer_no is a bind variable in this example. As bind variables you can use all attributes defined in your LU’s base view and all persistent Custom Fields. The base view attributes should be prefixed “v.” and the persistent fields should be prefixed “t.”, e.g. v.customer_no in this example. The parameters and the bind variables must be matched in sequential order, meaning that parameter one binds as the first bind variable in the select statement.
The Select statement should look like this:
SELECT Description FROM sales_market m, cust_ord_customer c WHERE
m.market_code = c.market_code AND c.customer_no = :customer_no

In our example we wanted to display the Custom Attribute Color on CustomerOrderLine as a read-only Custom Attribute.
We do that by choosing a new Read-only attribute on LU CustomerOrderLine.
We name the Custom attribute Color.
Then we choose Expression as implementation type and add our expression. Since we created Color on SalesPart previously, we now have a public function to fetch the value from SalesPart. So we enter our expression like this:
Sales_Part_CFP.Get_Cf$_Color(Sales_Part_CFP.Get_Objkey(v.contract,
v.catalog_no))

Now we have created a read-only Custom Attribute called Color on LU CustomerOrderLine.
A Local Custom Attribute is pretty much the same as a read-only field, this means that it is not possible to change the value of a local attribute either. The difference is that you choose a local attribute from the current LU.
You create an Local Custom Attribute by choosing it from the start page in the Wizard.
You choose the name from a list of all existing attributes in the LU.
This is the prompt that will be displayed if no translation exists. It’s possible to add translations per language.
You can add an internal comment, describing the field. This field is not used anywhere in runtime.

Existing fields can’t be insertable, updateable or have a default value. Neither can they be indexed as a Custom Field, since Indexes in this case are created on the LU itself.
You can make Local Custom Attribute able to search for by setting this flag.
Local Custom Attribute can never be public, since their characteristics comes from the LU they belongs to.
If you check Approved your field will be considered during Publishing.
This field shows whether or not your Custom attribute is published.