Create & Configure Additional Cluster Nodes
Note: Optional step only applicable when setting up a
Weblogic cluster
Creating more nodes from a cluster configuration already done on the "master"
node involves a number of manual steps and using some utilities from Oracle. This document will guide you through the steps you need to
perform.
Please note that you can not run multiple cluster nodes belonging to the same
cluster on a single host. You need a separate host for each cluster node!
All cluster nodes will run the JBoss Application
Server and the IFS Batch Server. Load balancing capabilities of IFS Connect
Server are limited, as described
here.
If not load balanced, the IFS Connect Server should run on a separate host.
Extend the existing Weblogic-domain (Administrative Console)
The already existing WebLogic domain is extended with an additional Machine,
additional Managed Servers and additional JMS Servers for each of the cluster
nodes. These changes are all done using the Weblogic Administration Console, so
the Administration Server must be running.
- Connect to the WebLogic Administration console on your already existing
"standard production" installation. The URL is http://<admin server
host>:<admin server port>/console
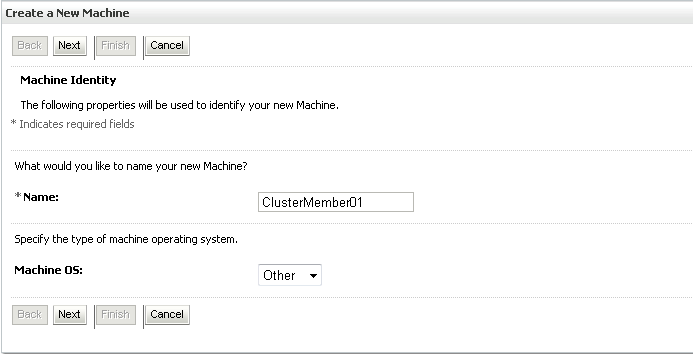
- Select Environment -> Machines in the Domain Structure navigator to
create an additional machine for your second cluster host.
Click Lock & Edit in the Change Center and then New. Specify the name of you
machine (host). Select Machine OS "Other".
- Select Environment -> Servers in the Domain Structure navigator and
create new servers by cloning an existing server already created by the
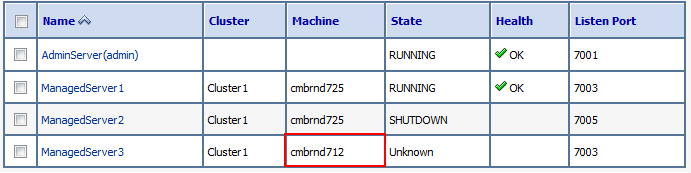
installer. - ManagedServer3 to ManagedServerN.
- Select the checkbox next to an existing managed server. E.g.
ManagedServer1
- Click "Clone". (If button is not enabled, press "Lock and Edit" in the
change center panel)
Note: The cloning is done to make sure all the correct parameter
configurations are copied onto the new managed servers as well.
| Property |
Value |
Note/Example |
| Server Name |
ManagedServer<n> |
Create two servers, e.g. one named ManagedServer3 and one
named ManagedServer4. |
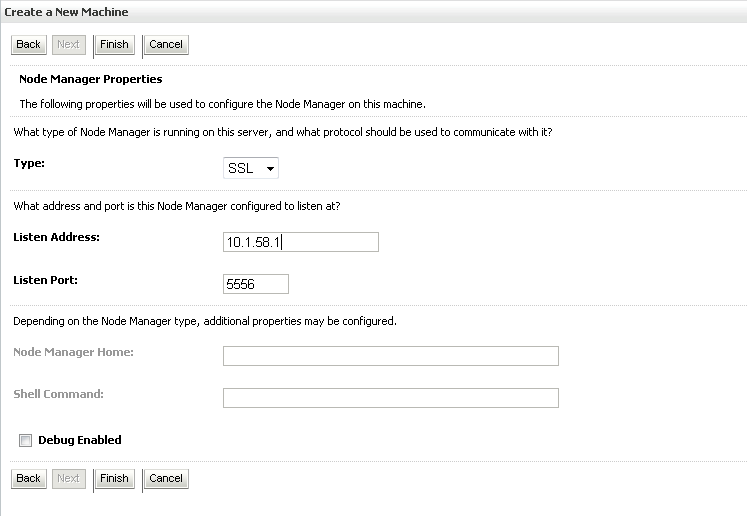
| Server Listen Address |
10.1.58.1 |
This is just an example value. Make
sure you use the IP address of the machine created in the previous
step (where the two new managed servers will run). |
| Server Listen Port |
7003 and 7005 |
These are just example values. You must ensure that
the ports you specify are not in use on the host. |
Click "OK" and make sure the new servers are made part of your already existing cluster.
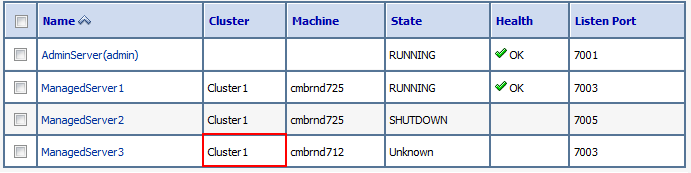
- The new server(s) must
be connected to a Machine (the one created previously). Select
ManagedServer3 and specify Machine.
Repeat for each Managed Server.
Click
Activate Changes in the Change Center.
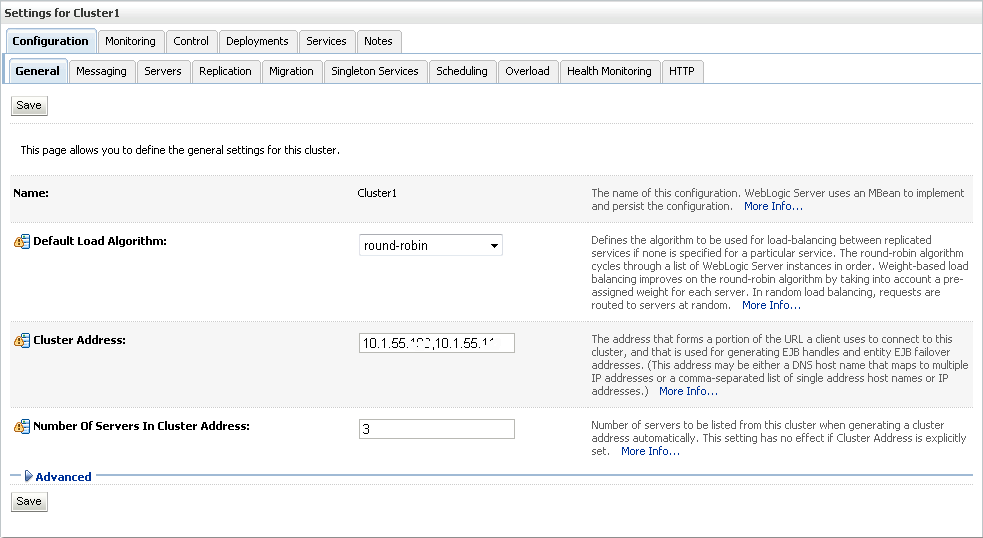
- Select Environment -> Clusters in the Domain Structure navigator and
select Cluster1. Click Lock & Edit in the Change Center.
Enter a comma-separated list of IP addresses for your two machines in the
Cluster Address field.
Click Save.
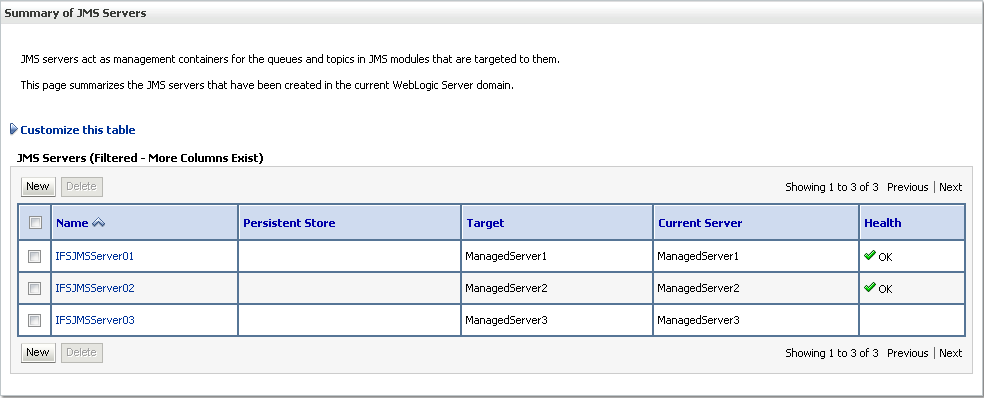
- Create a new JMS Servers for each of your new servers.
Select Services -> Messaging -> JMS Servers in the Domain Structure
navigator.
Click Lock & Edit and then New to create a new JMS Server.
Specify Name, Persistent Store and Target.
| Property |
Value |
Note/Example |
| Name |
JMSServer<n> |
Create two JMS servers, e.g. one named IFSJMSServer3 and one
named IFSJMSServer4. |
| Persistent Store |
(none) |
|
| Target |
ManagedServer<n> |
IFSJMSServer3 should target ManagedServer3 and
IFSJMSServerN should target ManagedServerN |
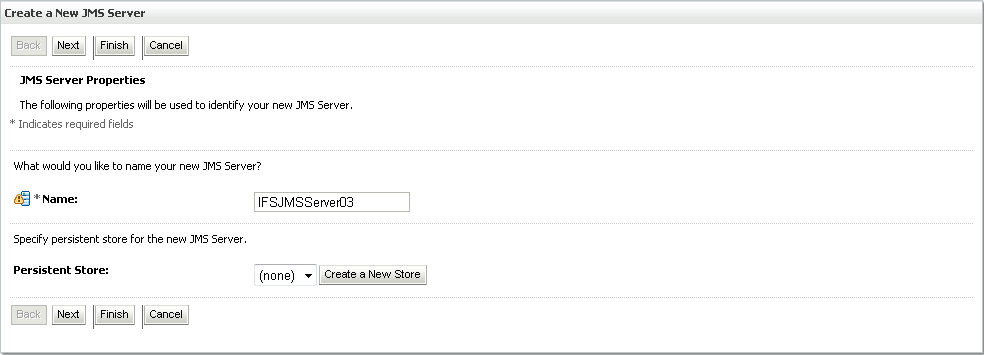
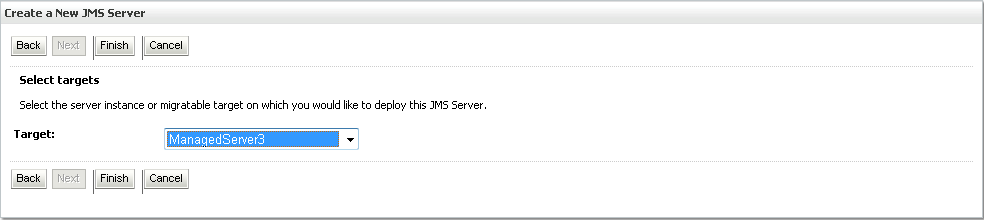
Click Finish and then Activate Changes in
the Change Center.
- Repeat step 2 - 5 for each cluster host.
The master node
On the "master" node (where you ran the Installer to create your first server
instance), run the pack-utility from Oracle and make an archive-file
containing the Weblogic domain. The pack-utility is located in the <Middleware
Home>/wlserver_12.1/common/bin directory and expects the following
arguments:
| Argument |
Description |
| domain |
The location of the WebLogic domain folder (i.e. <ifs_home>/wls_domain/<instance>) |
| template |
The name (and location of) the resulting archive-file |
| template_name |
A descriptive name of the template. Note: The name must be within quotes
if the name contains spaces. |
Windows example:
<Middleware Home>\wlserver_12.1\common\bin\pack -domain=C:\ifs\wls_domain\prod -template=c:\ifs\prod_domain.jar -template_name="prod"
Linux/Unix example:
./<Middleware Home>/wlserver_12.1/common/bin/pack.sh -domain=/opt/ifs/wls_domain/prod -template=/opt/ifs/prod_domain.jar -template_name="prod"
The next step is to create a zip file containing directories from your <ifs_home>
folder. Note that you should shut down the Weblogic Domain prior to creating the
zip-file in order to avoid locked files. The directories to be copied are the
following:
- bin
- instance/<instance>
- omit the files located directly under this directory
- omit the ear-subdirectory
- omit the logs-subdirectory
- java
- javaruntime
- oracle
Copy the resulting zip-file to all other cluster node hosts.
Ensure that you have Weblogic Server installed on each of the cluster nodes
and that the Node Manager is running.
Unpack the zip file containing the files and folders from <ifs_home> created
earlier to the same folder structure as on the master node. It is vital that you
really use the exact same folder structure on all nodes, i.e. if your <ifs_home>
on the master node was created in C:\ifs\prod, you need the same
folder structure on all cluster nodes.
Copy the file FndAuthenticationProviders.jar from <ifs_home>\javaruntime
to <Middleware Home>\wlserver_12.1\server\lib\mbeantypes
Now run the unpack-utility, located in the <Middleware
Home>/wlserver_12.1/common/bin directory, to extract the domain. The
unpack needs the following arguments:
| Argument |
Description |
| template |
The name (and location of) the archive-file |
| domain |
The destination of the WebLogic domain folder (i.e. <ifs_home>/wls_domain/<instance>) |
log |
The name (and location of) a log-file generated by the tool. |
Windows example:
<Middleware Home>\wlserver_12.1\common\bin\unpack -template=c:\ifs\prod_domain.jar -domain=C:\ifs\wls_domain\prod -log=C:\ifs\prod_unpack.log
Linux/Unix example:
./<Middleware Home>/wlserver_12.1/common/bin/unpack.sh
-template=/opt/ifs/prod_domain.jar -domain=/opt/ifs/wls_domain/prod -log=/opt/ifs/prod_unpack.log
The IFS Batch Server configuration will be identical on all cluster nodes. This
has some
implications on the message processing.
Web Server Integration
Include the host names of the cluster nodes into the web server configuration file
mod_wl_ohs_<Instance>.conf created for the webloginc domain.
<IfModule weblogic_module>
    ...
    WebLogicCluster ClusterMember01,ClusterMember02
    ...
<IfModule>
Restart web server control after altering the configurations.
The IFS Connect Server host
If not load balanced, the IFS Connect Server agent should run on a separate host and therefore you
need to create a separate installation on this host.
Create a <ifs_home> using the zip file you created earlier. Start
only the IFS Connect Server agent using the start scripts in <ifs_home>\instance\<instance>\bin.
Alternatively install as
remote Connect Server.