Manually Configure WebSphere for Extended Server

This page describes the steps necessary to configure WebSphere Application Server 8.5 for  IFS Applications

Content

    Start/stop scripts
    Copy required Jar files
    Start the WebSphere Administrative Console
    Configure Application Server
    Environment
    Authentication Data
    JDBC Resources
    Advance Security
    Service Integration Bus
    JMS Resources

Start/stop scripts

This step is optional and is only needed if you do not want to supply the username and password for stopping the server.

  1. Open the file 'soap.client.props' located in <profile_home>/properties
  2. Set the following properties:
    Property Value Example
    com.ibm.SOAP.securityEnabled true com.ibm.SOAP.securityEnabled=true
    com.ibm.SOAP.loginUserid username com.ibm.SOAP.securityEnabled=wasAdmin
    com.ibm.SOAP.loginPassword password com.ibm.SOAP.securityEnabled=secretPassword
    Note that the password provided should be in clear text. In order to encrypt it run PropFilePasswordEncoder in <was_home>/bin
    Example:
      PropFilePasswordEncoder <profile_home>/properties/soap.client.props com.ibm.SOAP.loginPassword

    Test your changes by stopping the server. You should not be prompted for username and password. Also make sure that the password is no longer in clear text in soap.client.props.

Copy required Jar files

  1. Copy the following jar files from <ifs_home>/javaruntime directory to <was_home>/lib/ext directory:
      ifs-was-user-registry.jar
      ifs-fnd-common.jar
      F_oracle.jar
      F_pool.jar
    Restart the server in order to load the new jars.
    Note: For SP1 and onwards copy the above mentioned files to <ifs_home>/was_domain/lib instead but replace ifs-fnd-common.jar with ifs-fnd-driverunlocker.jar. It is also not necessary to restart the server at this point.

Start the WebSphere Administrative Console

  1. Start the WebSphere Administrative Console
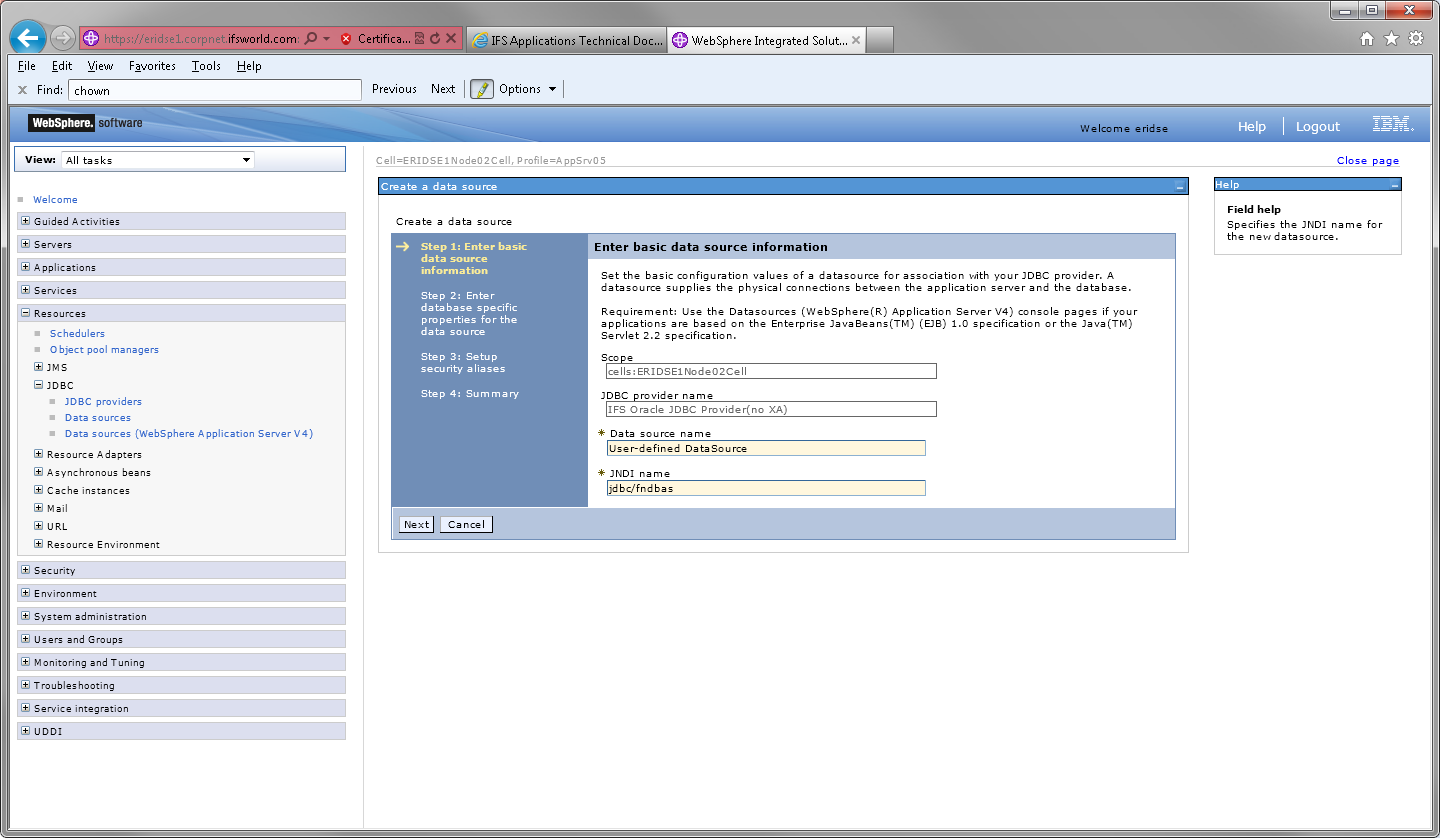
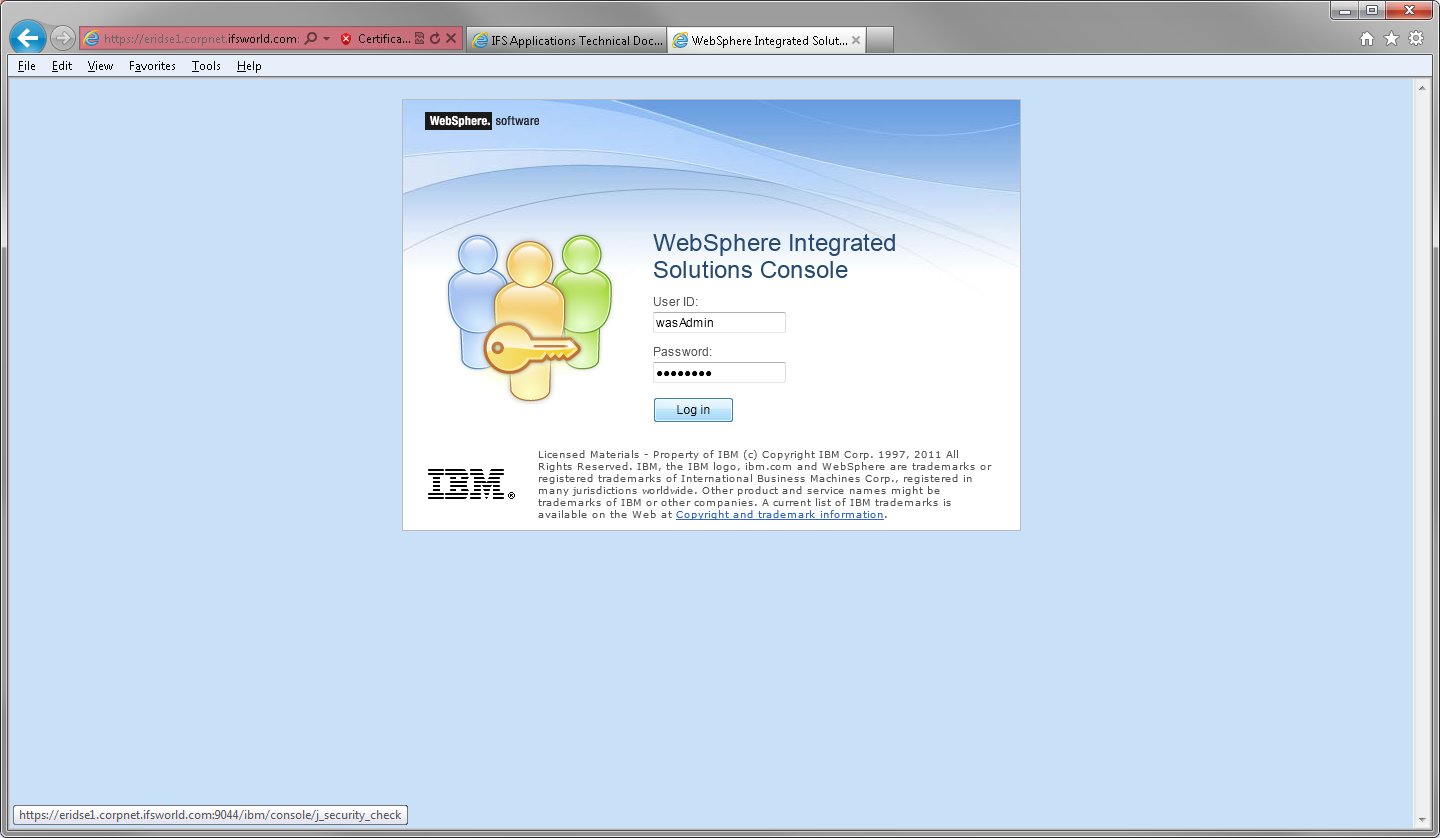
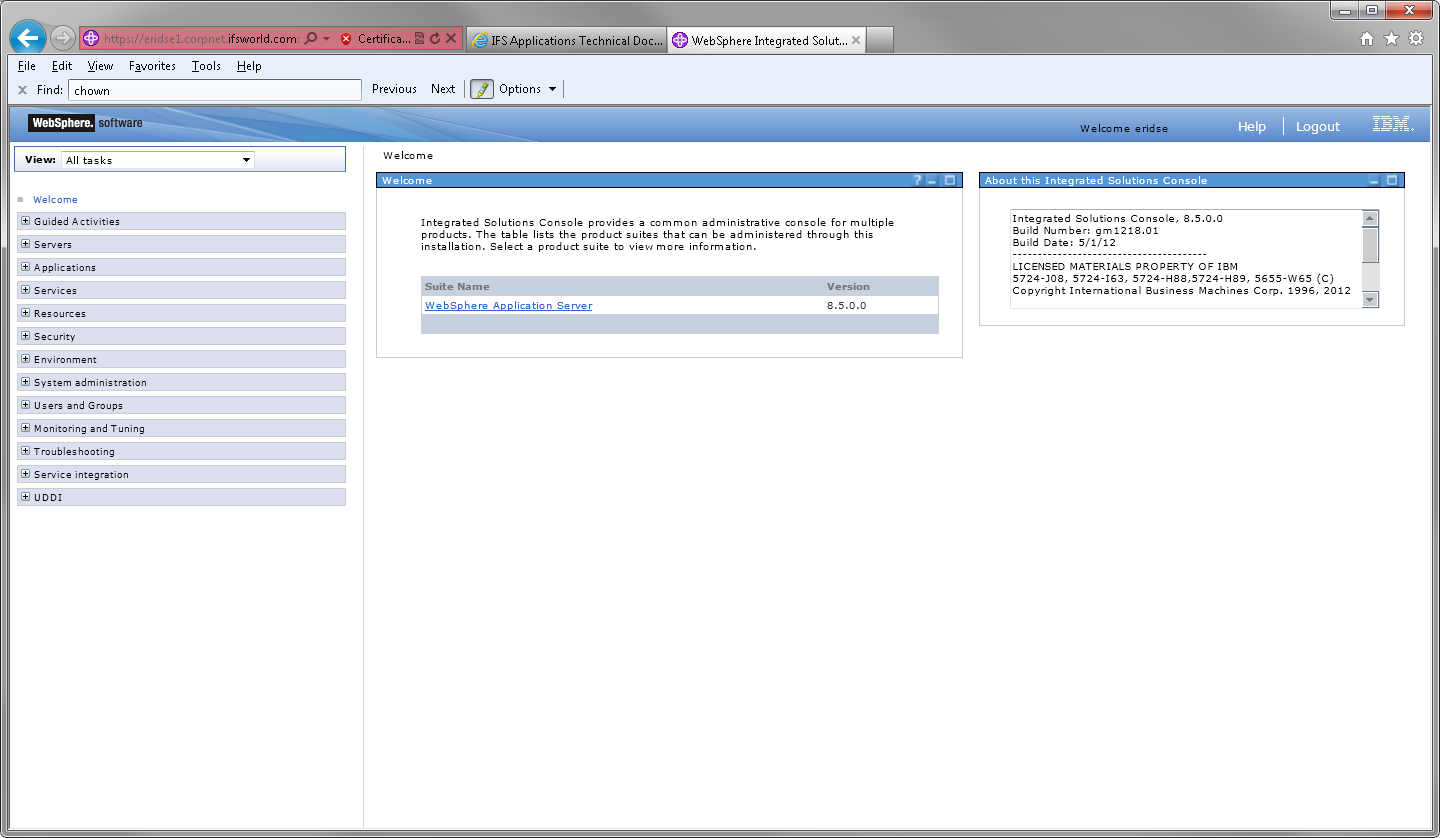
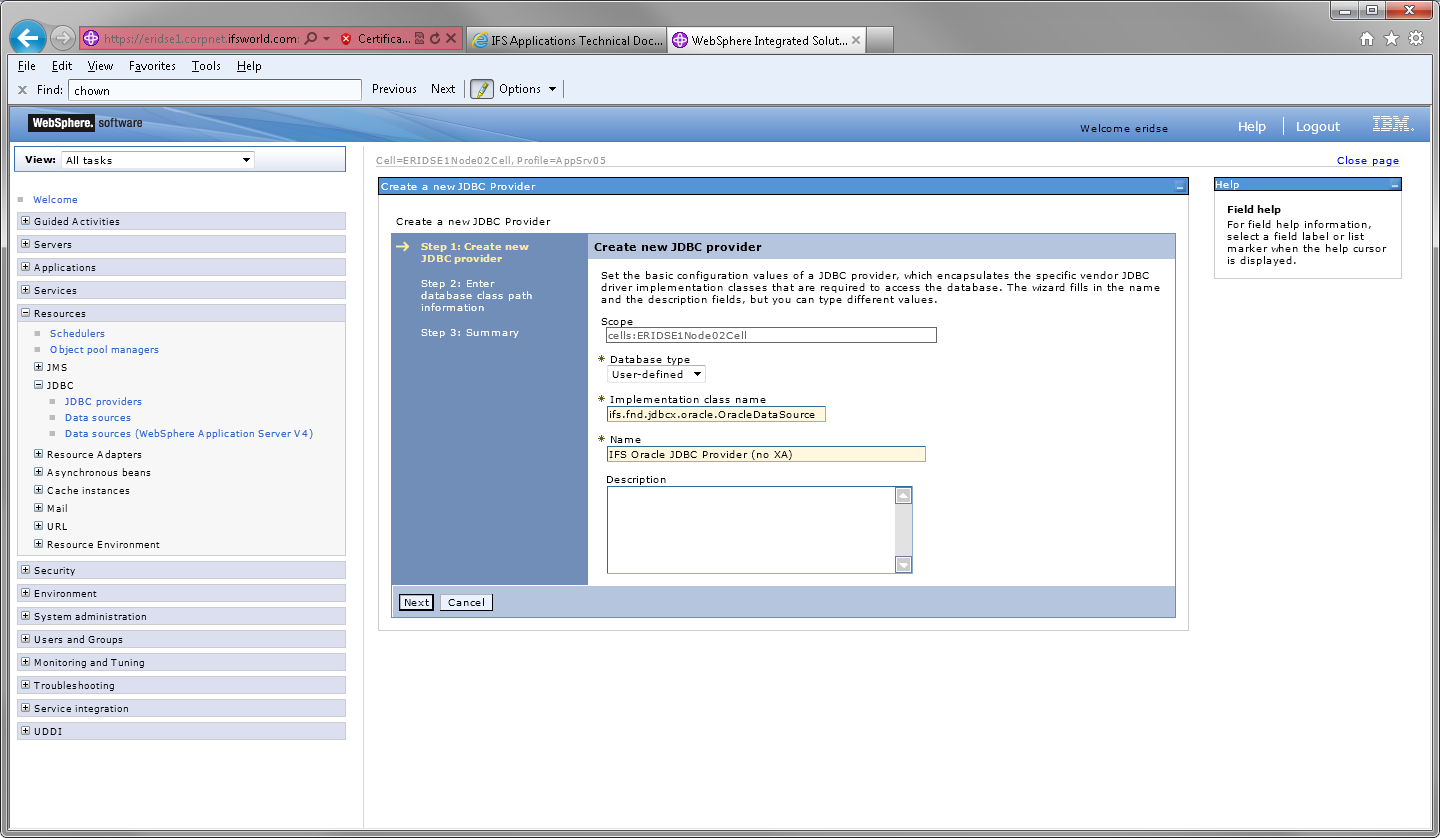
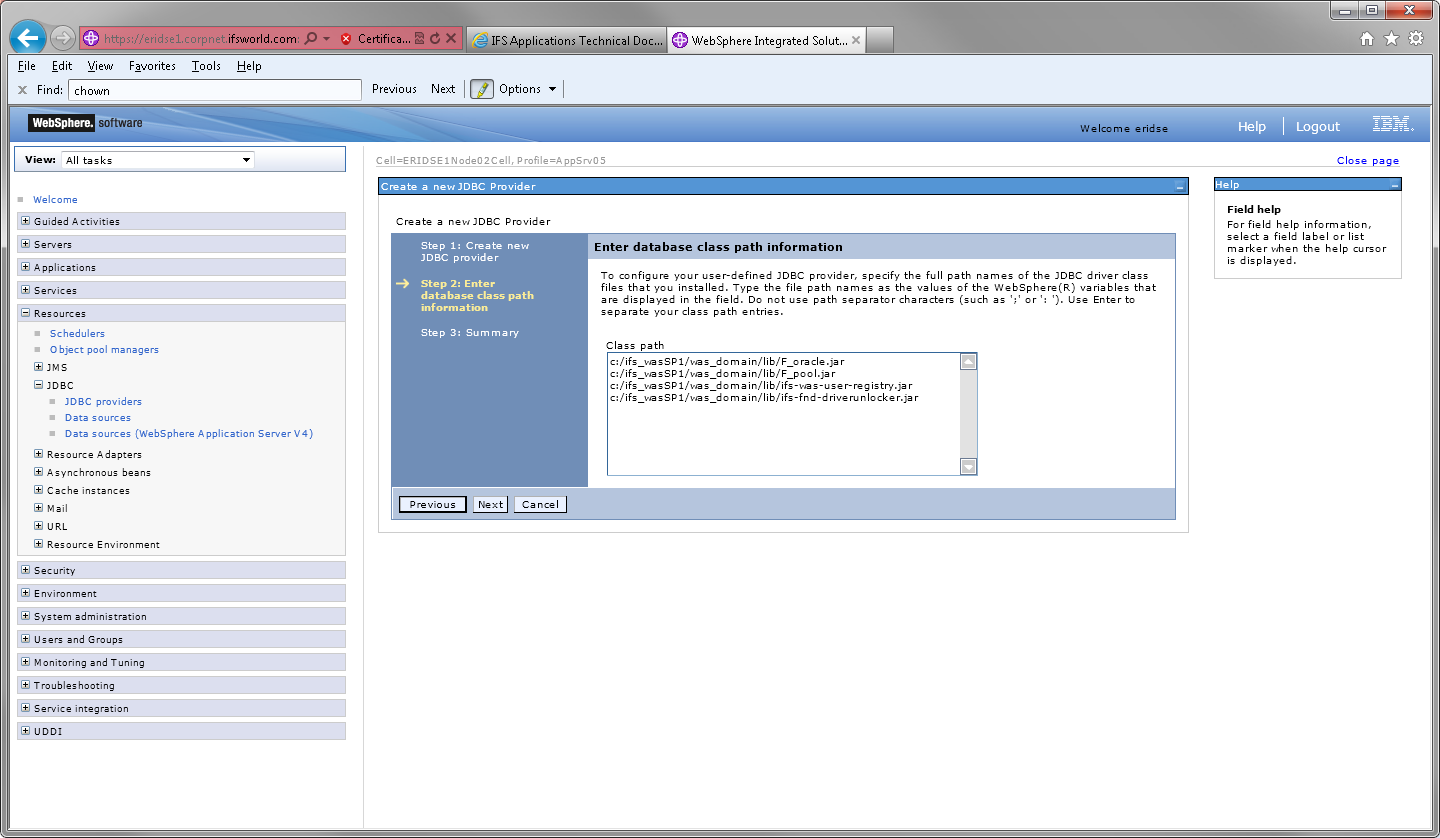
    Point your browser to http://<host_name>:<port_number>/ibm/console. For reference check the file AboutThisProbile.txt which resides in your profile home where you can find the host name and the Administrative console port: <profile_home>/logs/AboutThisProfile.txt.
  2. Press continue and proceed to login on WebSphere Administrative Console using the credentials from when you created the profile.
  3. Main page in WebSphere Administrative Console.


Configure Application Server

  1. Go to Servers -> Server Types -> WebSphere application servers.
  2. Select server1 and go to Java and Process Management ->Process Definition -> Java Virtual Machine.
     - Set the following General Properties and press 'Apply'.
    Property Value Note/Example
    Classpath <ifs_home>\javaruntime\F_oracle.jar

    <ifs_home>\javaruntime\F_pool.jar

    C:\ifs\javaruntime\F_oracle.jar

    C:\ifs\javaruntime\F_pool.jar

    Initial Heap Size 2048 Needed for performance and to deploy larger ear files
    Maximum Heap Size 2048  
    Note: For SP1 and onwards you do not need to specify any jars in the classpath.
  3. Select Custom Properties (Application servers>server1>Process definition>Java Virtual Machine>Custom properties)
     - Create the following custom properties
    Name Value Note/Example
    fndext.home <ifs_home> Location of the ifs home. E.g.C:\ifs or /opt/ifs
    fndext.instance <instance> The instance name used
    fndext.loggingConfig j2ee-logging.properties The name of the logging properties file
  4. Go to 'System administration > Deployment manager' and select Java SDKs.
    Select Java 1.7 and press 'Make Default'.
    Note: This is only applicable for WebSphere 8.5 and only if another SDK has been installed for WebSphere. You will be able to continue without SDK 7 but it is not recommended.
  5. Transaction Service (Application Servers > server1 > Container Services > Transaction Service)
     - Set the following General Properties
    Property Value Note/Example
    Total Transaction Lifetime Timeout 36000 Needed for performance in IFS Connect
    Maximum Transaction Timeout 36000 Needed for performance in IFS Connect
  6. ORB Service (Application Servers > server1 > Container Services > ORB Service)
    - Set the following General Properties
     
    Property Value Note/Example
    Pass by reference Checked Needed in IFS Connect to serialize objects properly

Environment

  1. Host Aliases (Environment > Virtual Hosts > default_host > Host Aliases)
     - We will make use of the default_host in this document and also when deploying applications. It is off course possible to create other virtual hosts. Please remember that these must then be used during the deployment process
    In our example we will use the following ports:
     
    Host Name Port Note/Example
    * 58080 The port selected in during installation


Authentication Data

  1. Security > Global Security > Java Authentication and Authorization Service > J2C authentication data.

    - Uncheck "Prefix new alias names with the node name of the cell (for compability with earlier releases)"

    - Add the following alias and set the appropriate password.
     

    Alias User ID Password
    jmsuser IFSWEBSPHEREMSGUSER IFSWEBSPHEREMSGUSER
    Note: This user must exist in the database. Make sure that it exists, otherwise add it. You can use any username and password as long as it is reflected in this alias configuration.

JDBC Resources

  1. Create a JDBC provider (Resources > JDBC > JDBC providers)
    - Change the scope to 'Cell' and press 'new' to create the JDBC providers.


    Database Type Implementation class name Name Class path
    User_defined ifs.fnd.jdbcx.oracle.OracleDataSource IFS Oracle JDBC Provider (no XA) <was_home>/lib/ext/F_oracle.jar
    <was_home>/lib/ext/F_pool.jar
    <was_home>/lib/ext/ifs-fnd-common.jar
    <was_home>/lib/ext/ifs-was-user-registry.jar
    Note:For SP1 and onwards the classpath should be:

    <ifs_home>/was_domain/lib/F_oracle.jar
    <ifs_home>/was_domain/lib/F_pool.jar
    <ifs_home>/was_domain/lib/ifs-was-user-registry.jar
    <ifs_home>/was_domain/lib/ifs-fnd-driverunlocker.jar

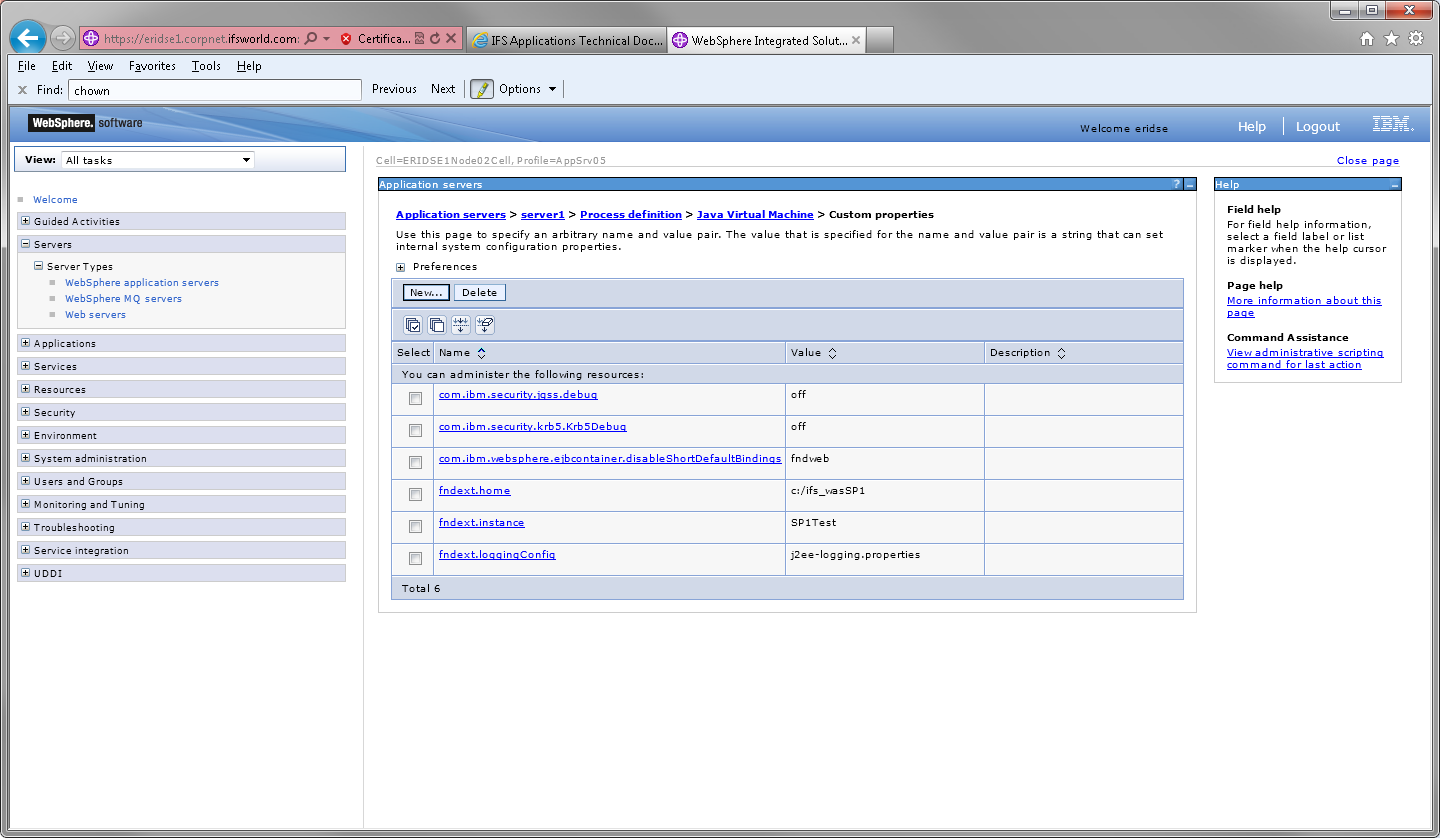
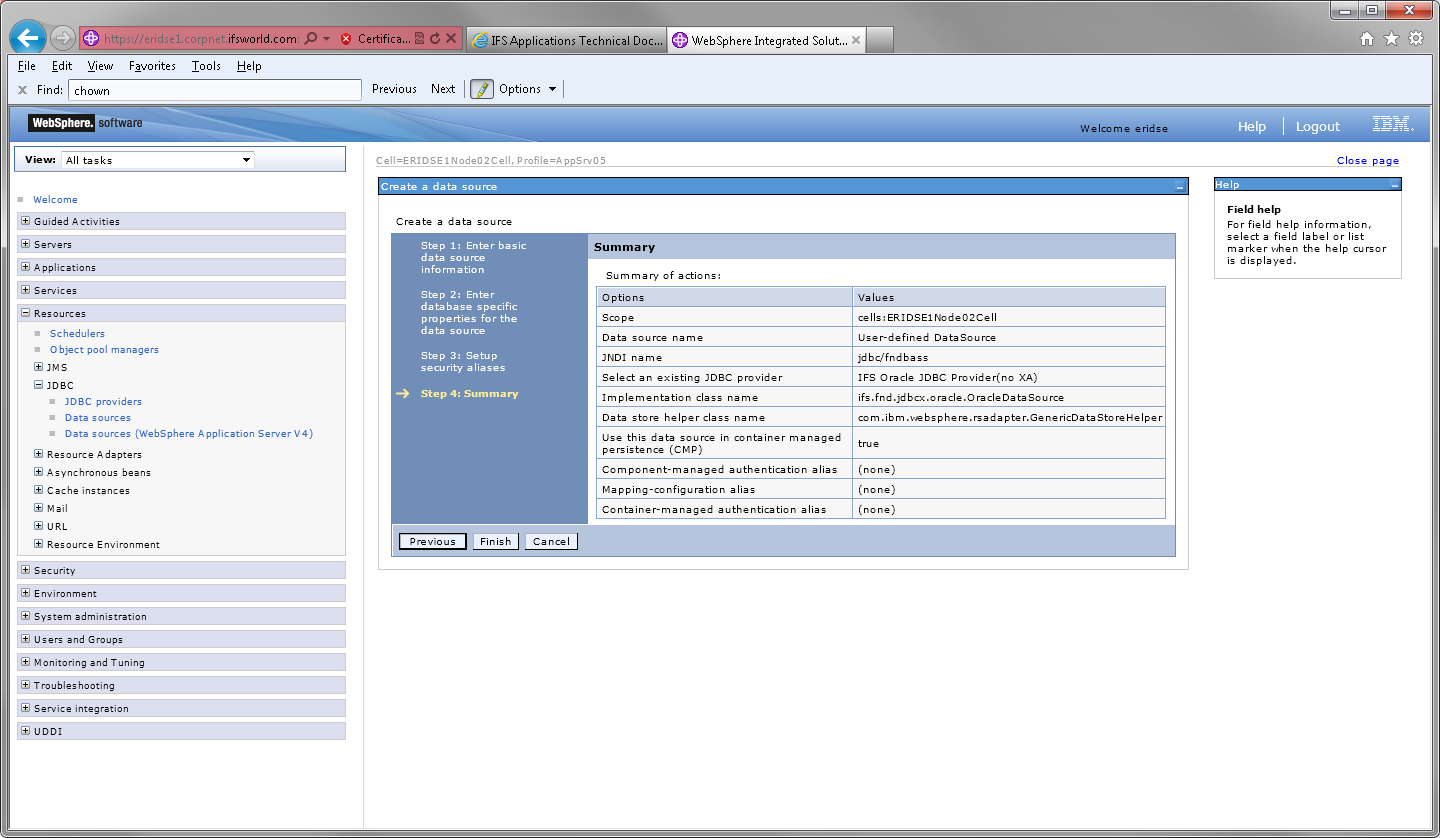
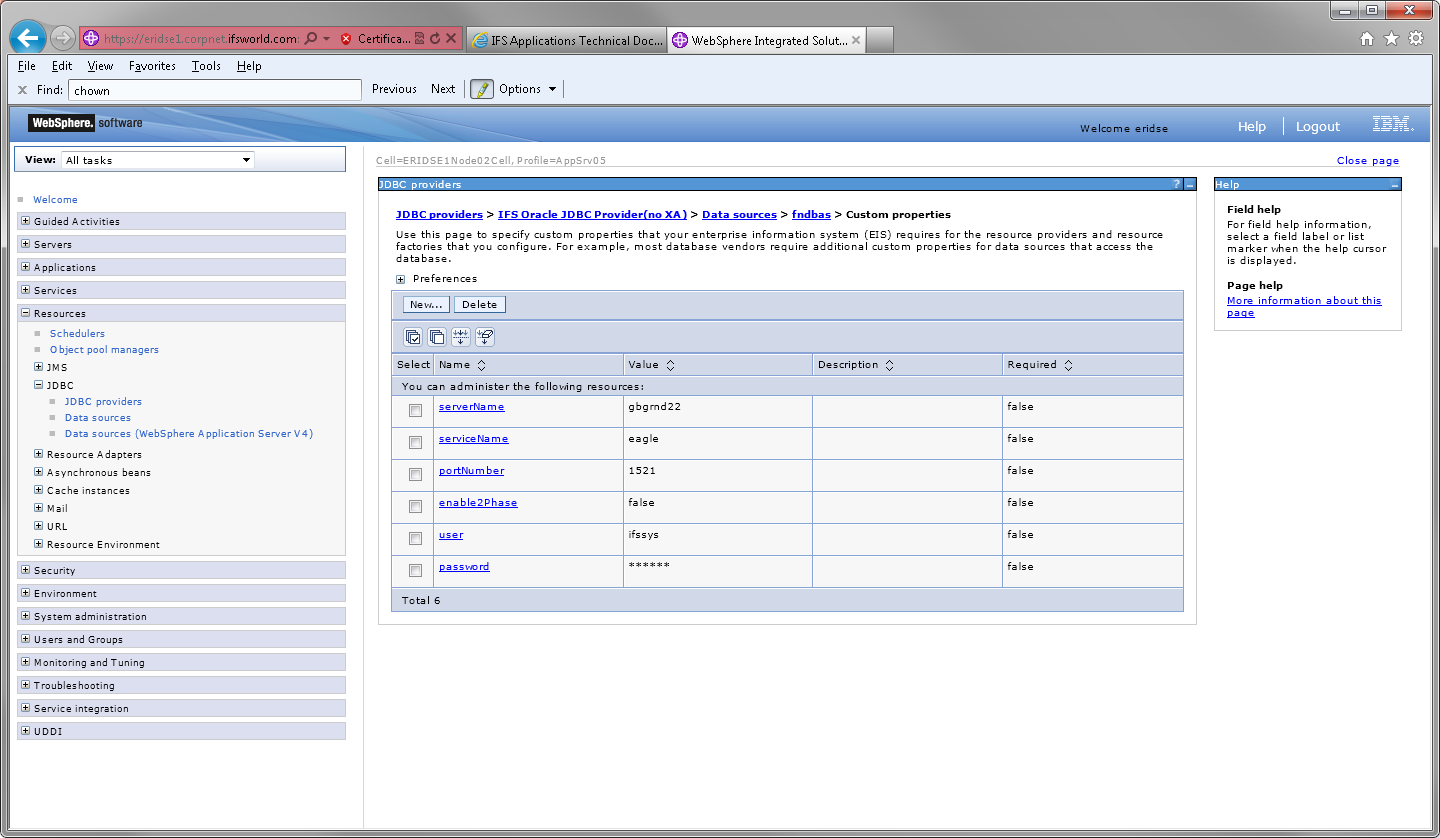
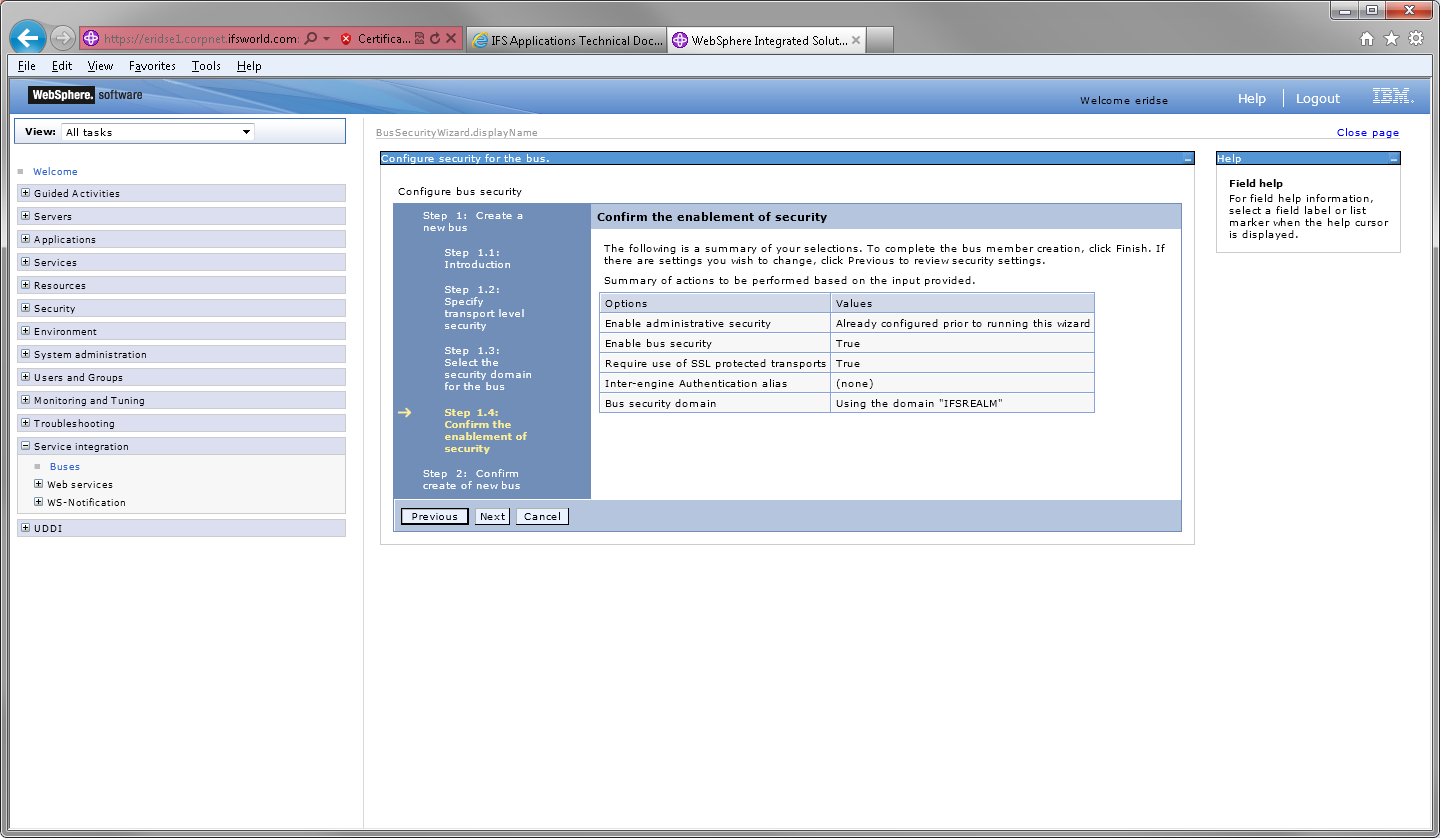
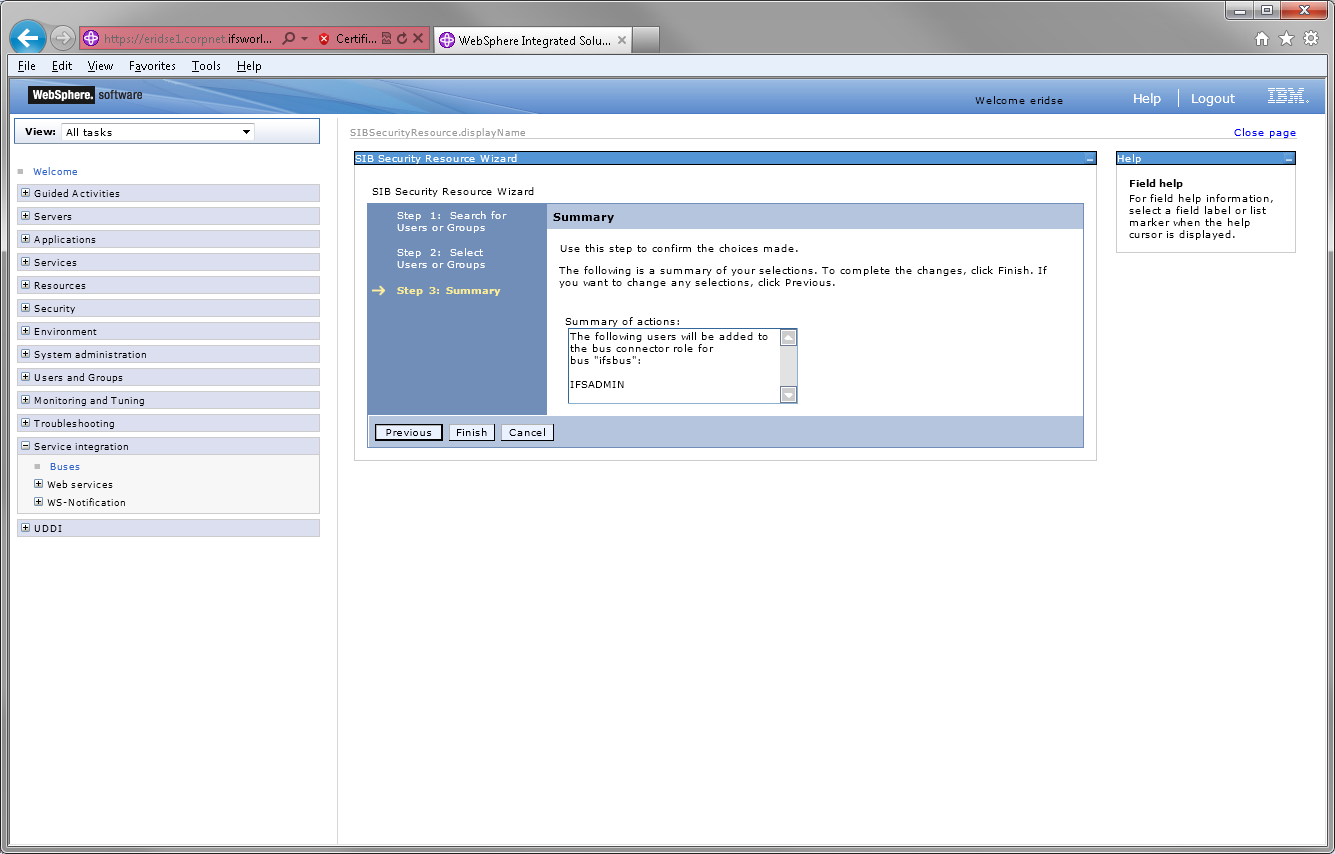
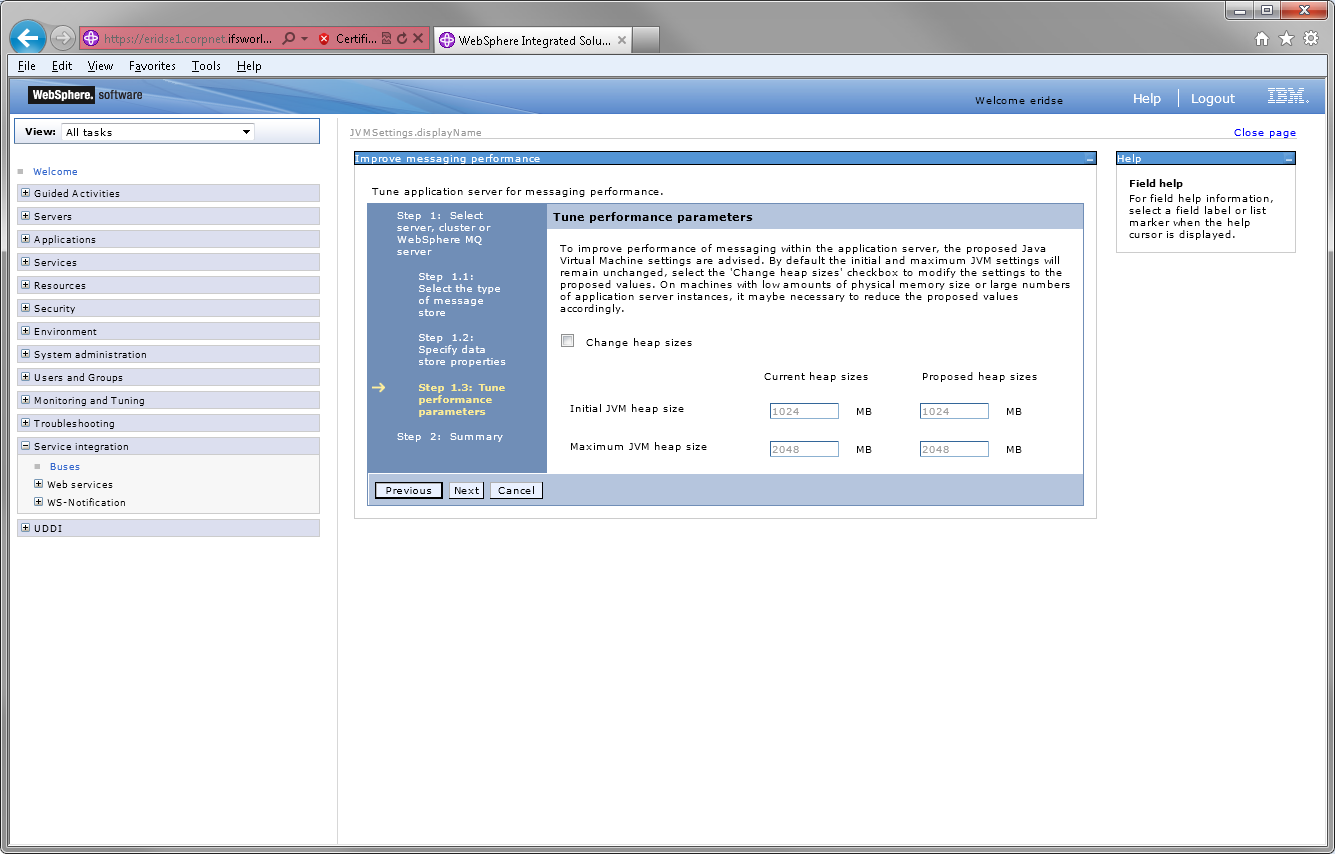
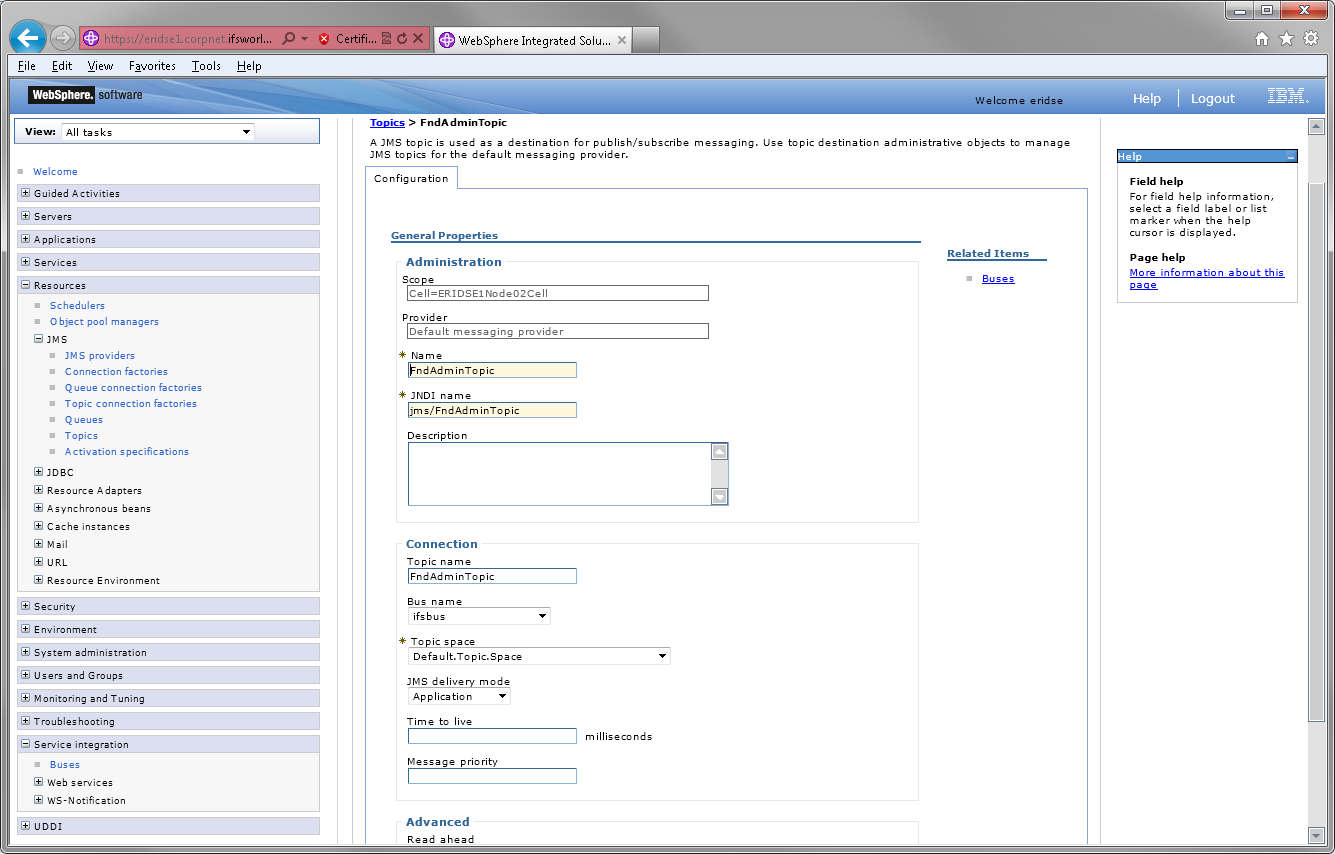
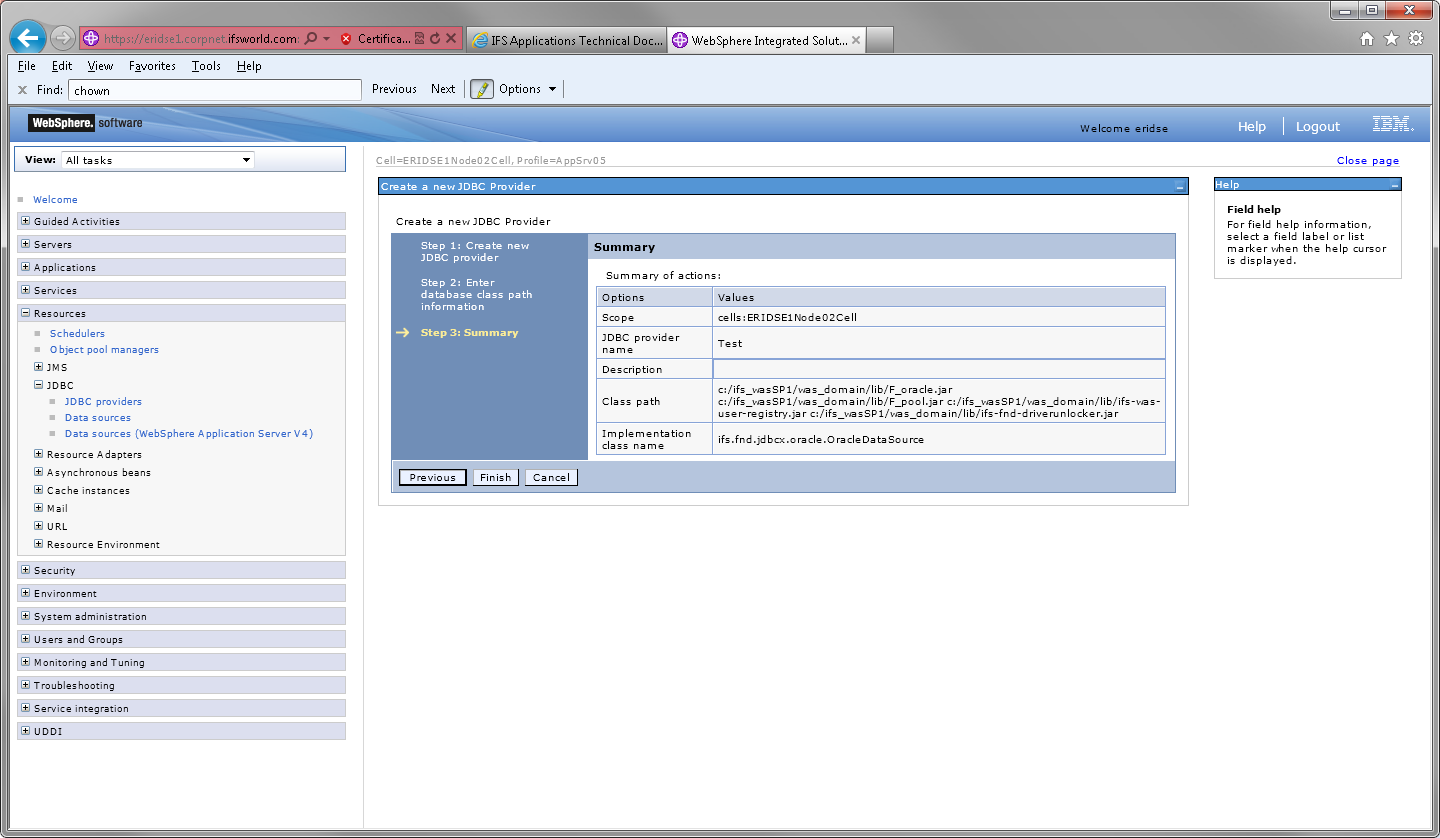
    - Press "Finish" and save changes.
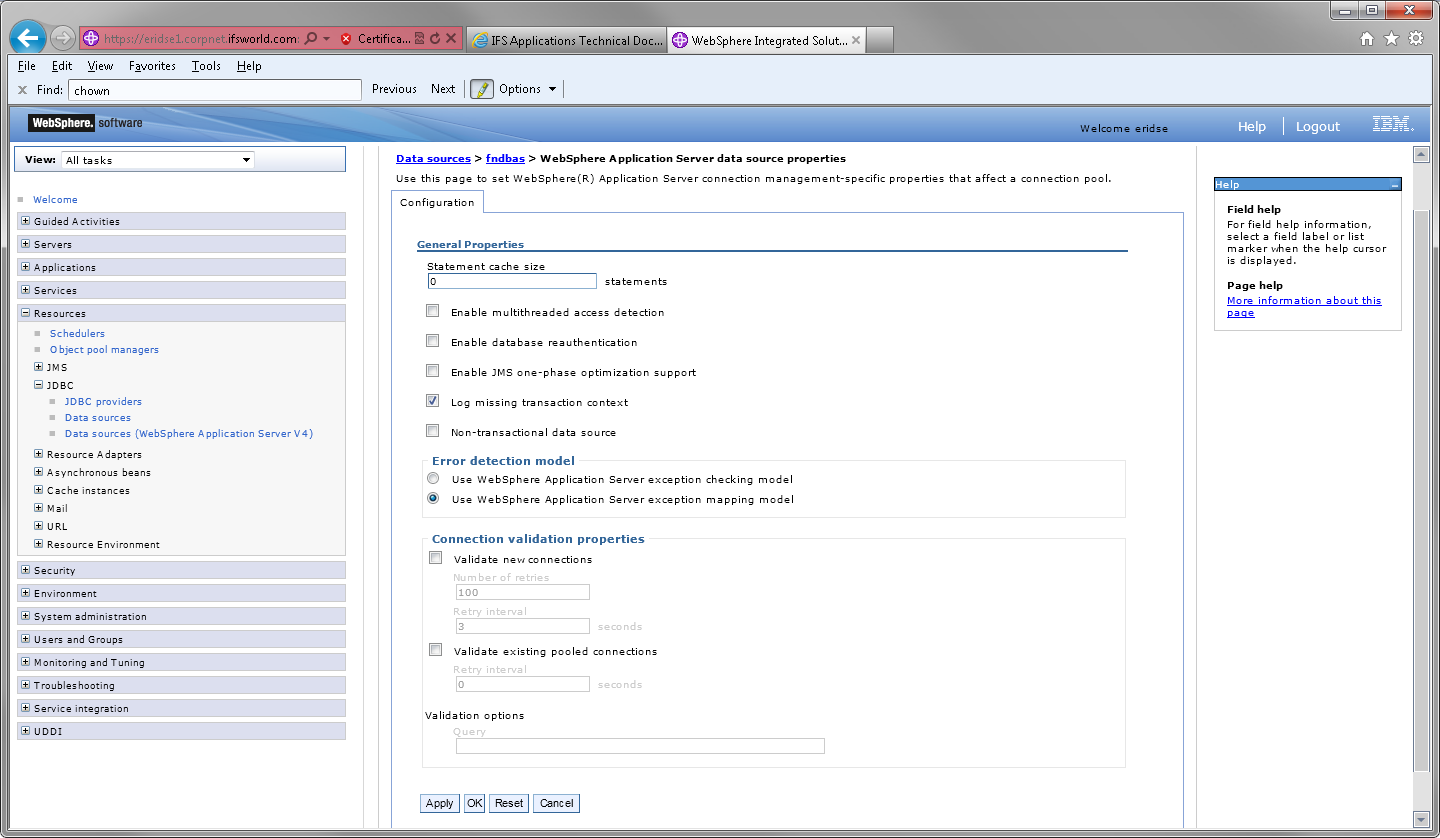
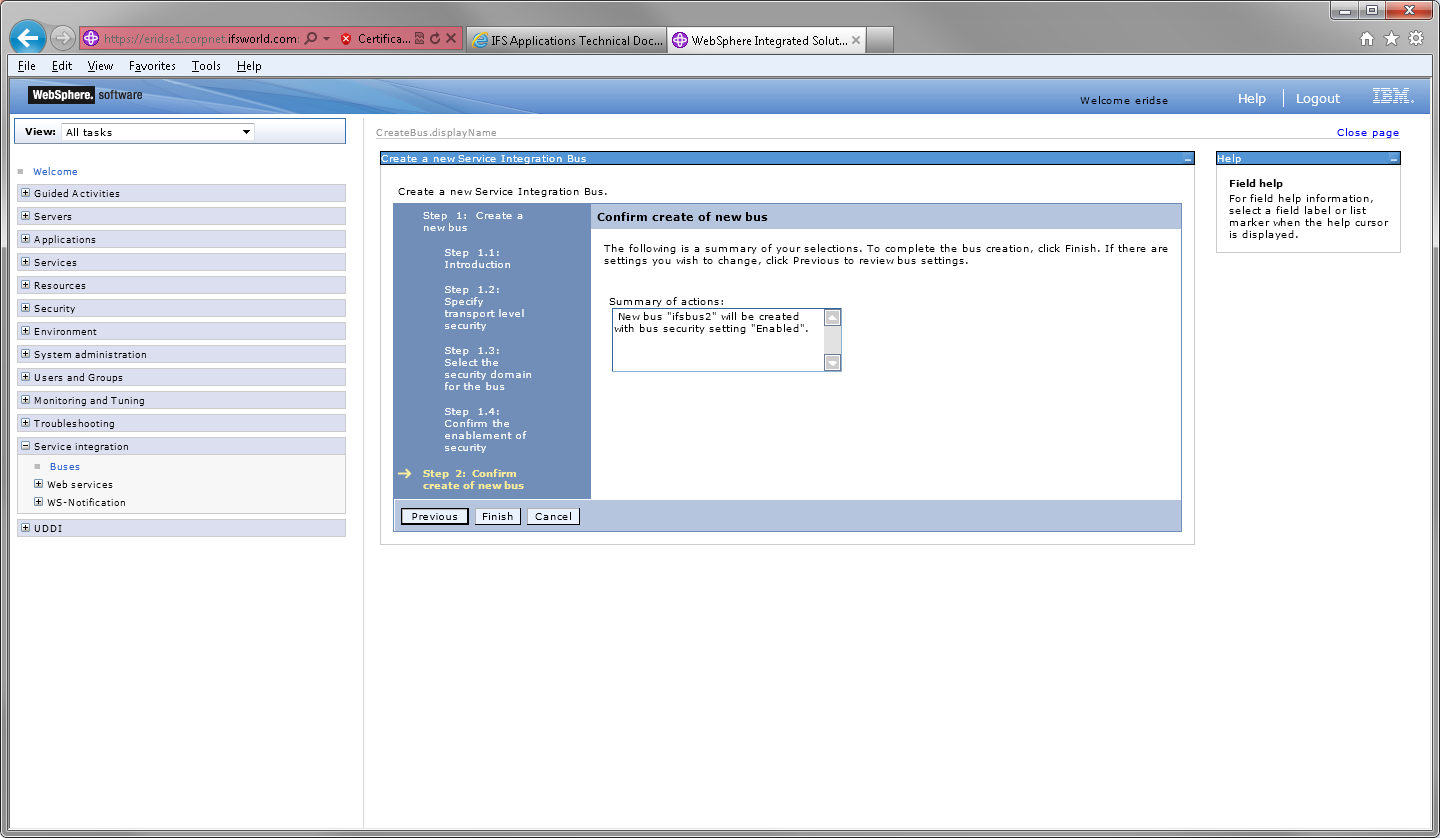
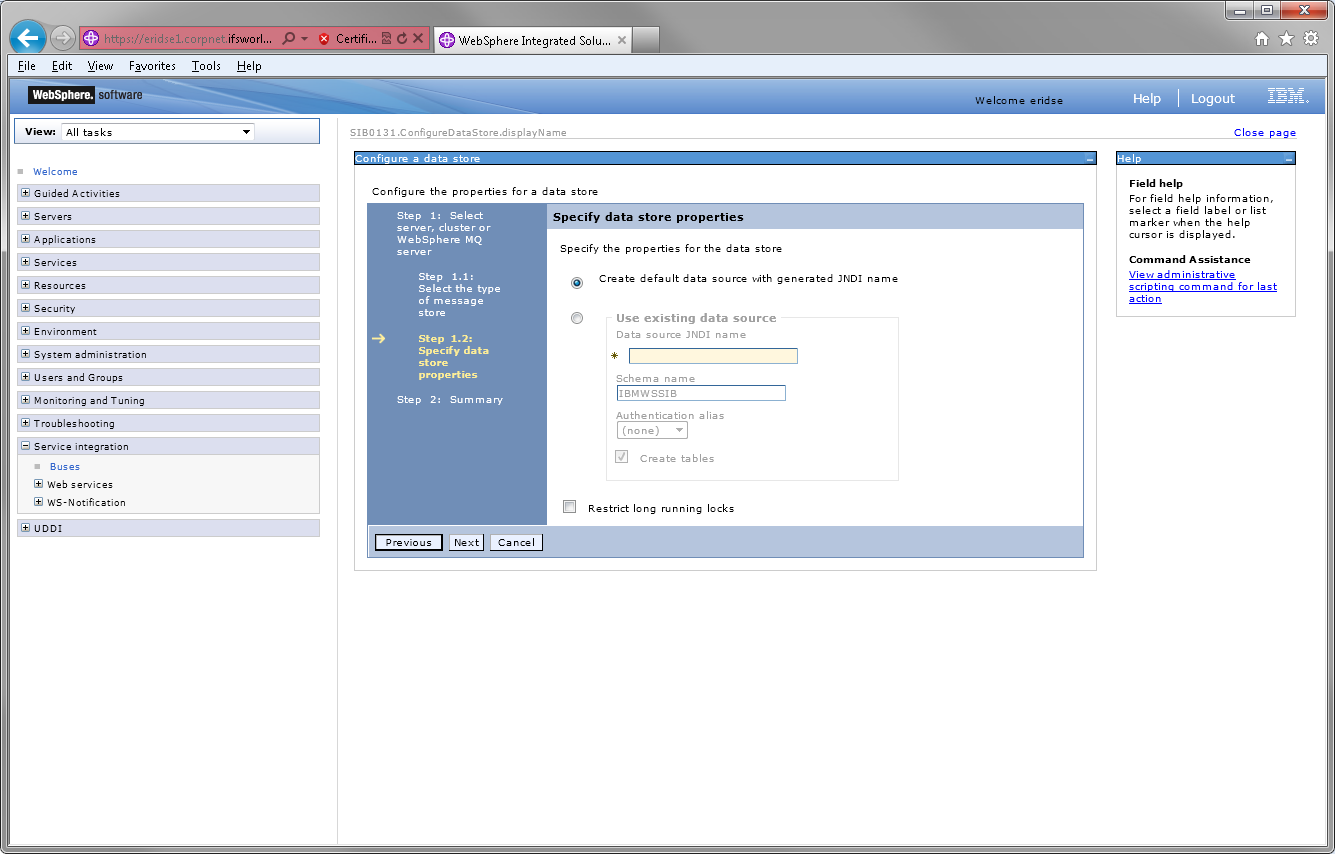
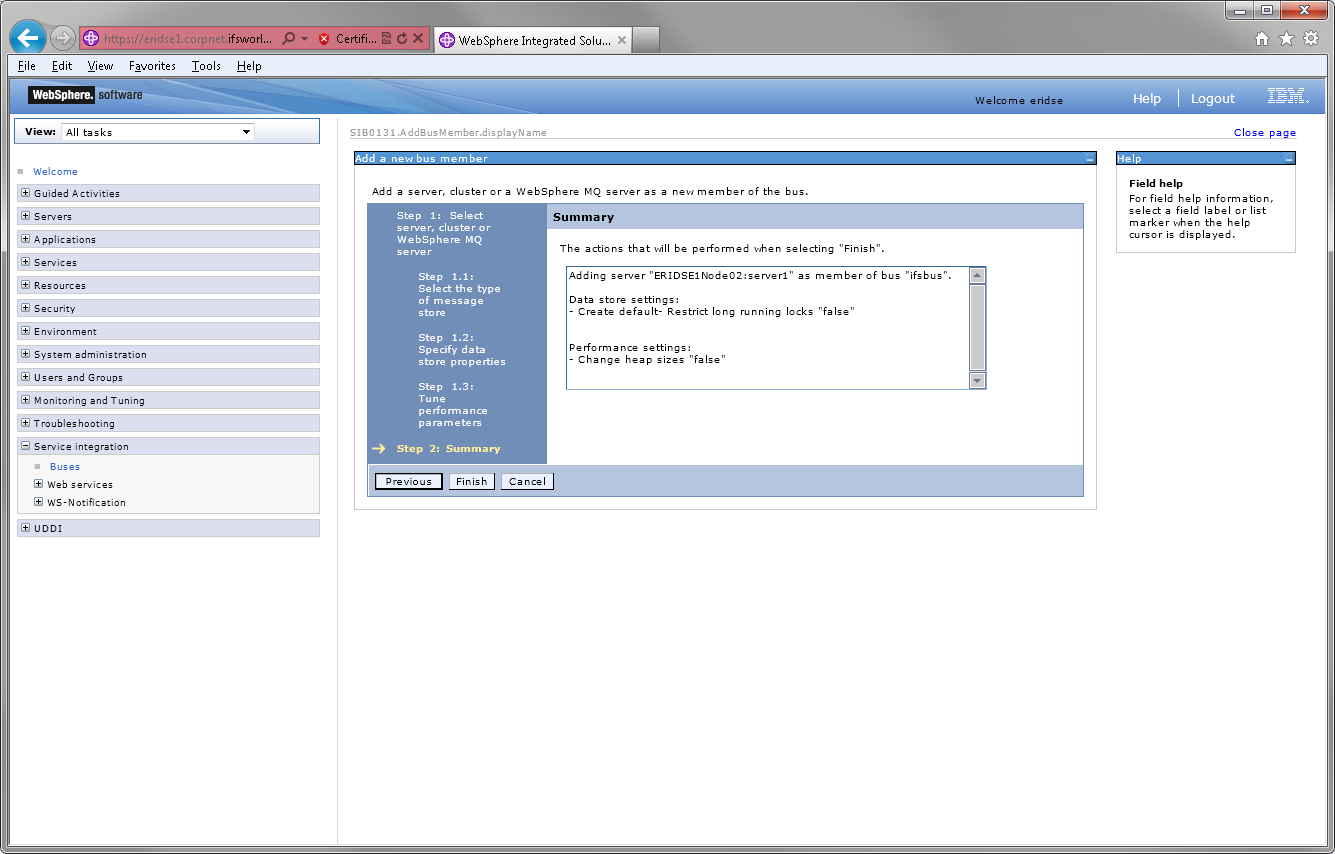
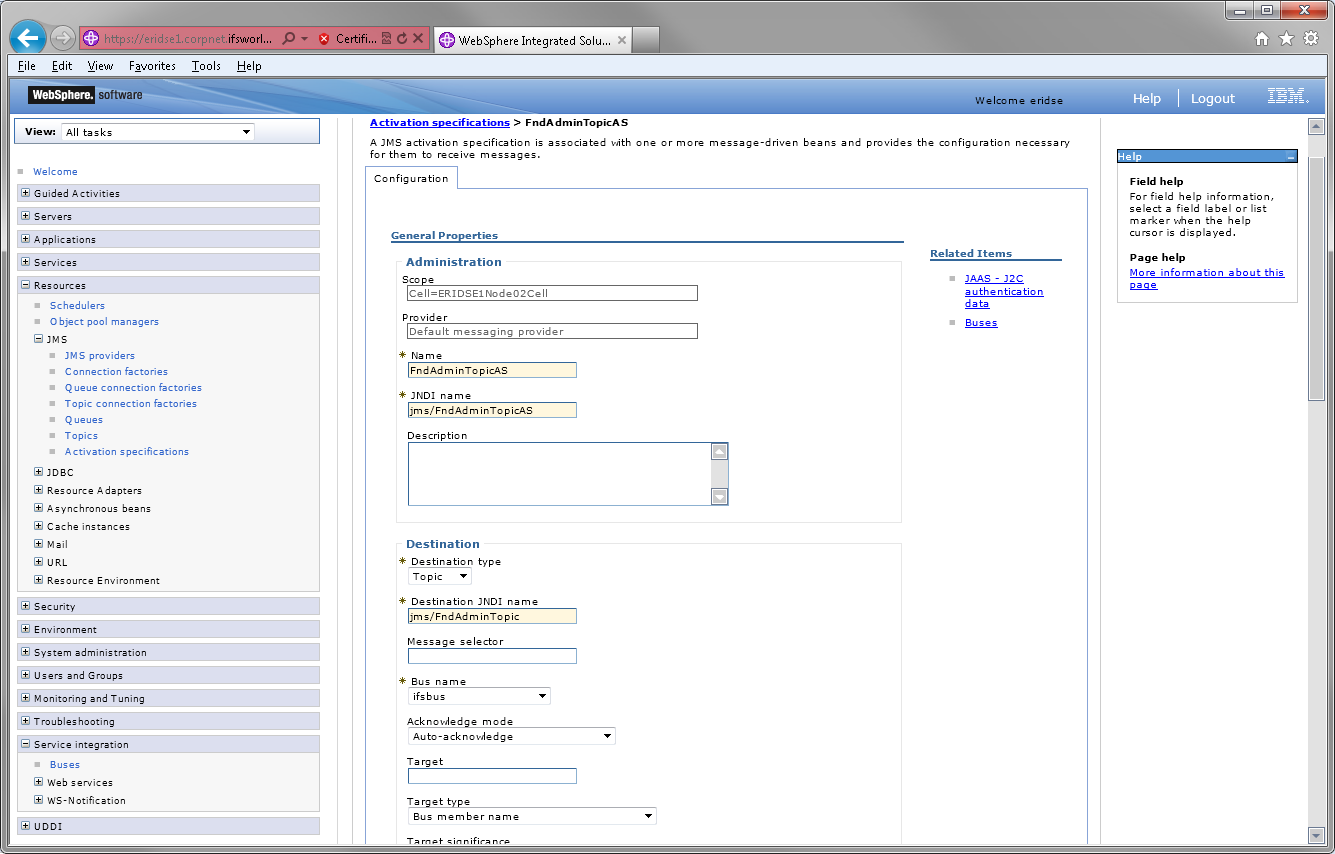
  2. Create Data Sources on IFS Oracle JDBC Provider (no XA) 
     - JDBC providers > IFS Oracle JDBC Provider (no XA)  > Data sources

    - Press New...


    Name JNDI Name Component-managed authentication alias Datastore helper class name
    fndbas jdbc/fndbas (none) com.ibm.websphere.rsadapter.GenericDataStoreHelper


    - Select the data source created. Go to "Custom properties". Modify the following custom properties and fill in the correct information.

     
    Name Value Example
    serverName The host name of the Database cmbgse4
    serviceName The service identifier D0102
    portNumber The port to connect 1521
    user User name ifssys
    password Encrypted password ****

    - Also create a custom property with following values:

     
    Name Value Type
    enable2Phase false java.lang.Boolean

    Note that you will probably have a lot more properties than shown in the above screenshot.

  3. Set statement cache size to 0 for all data sources
     - This is done in WebSphere Application Server data source properties.
       - JDBC providers > Oracle JDBC Driver (no XA)  > Data sources >fndbas> Additional Properties > WebSphere Application Server data source properties

    Example:
  4. Save changes. Test the connection to make sure everything is setup correctly. If the connection fails you might need to restart the server.

Advanced Security

  1. Go to Security>Global security and make sure the following settings are applied:
    Enable administrative security Enable application security Java 2 security
    Checked Checked Unchecked
  2. Go to Security > Security domains
  3. Press New...
  4. Press OK
  5. Assign this realm to all scopes
  6. Expand User Realm and select 'Customize for this domain'. Select 'Standalone custom registry' and press 'Configure'
  7. Set the following General Properties.
    Allow the system to create a realm name Ignore case for authorization
    Selected ifs.fnd.sf.j2ee.security.websphere.FndOracleUserRegistry Selected

    And the following Custom properties.
    jdbcDriverClass
    Name Value Note
    dbAppowner IFSAPP ifs.application.owner property in <instance>_configuration.xml
    dbPassword <Encrypted password> ifs.system.password.encrypted in <instance>_configuration.xml
    serverName Name of the server Where the database is
    databaseName The SID The name of the database
    portNumber The port number Optional, defaults to 1521
    This information can be found in the configuration file found in <ifs_home>/instance/<instance>/<instance>_configuration.xml.


  8. Press 'OK'

  9. Save your changes and restart in order to load our new user registry.
    More information on security is given in:
    Configure Single Sign On for WebSphere and Configure LDAP on Websphere Application Server

Service integration bus

  1. Go to Service Integration > Buses. Create a new bus. 
    Name Bus security
    ifsbus checked
     

  2. Accept the default values during the wizard until the step regarding security domain. Select IFSREALM here and continue.
    Press Finish to confirm and finish bus creation.


  3. Save the bus created.
  4. Go to Buses > ifsbus > Security. Select link "Users and groups in bus connector role". Press New... and select the 'Users' radio button and IFSADMIN as search pattern and press 'next'.
    Select IFSADMIN from the list and press 'Next' and finally 'Finish'.


  5. -Save changes
  6. Repeat the previous steps and add 'Everyone', to the list. Note that 'Everyone' belongs to 'The built in special groups'. Server should be defined as default.
  7. Add Bus members (Buses > ifsbus >Bus Members)
    Press "Add" and select your server. Press Next
  8. Select option "Data store". Press Next.
  9. Select Create default data source. Press Next.

  10. Press Next

  11. Press Finish.
  12. Save changes.
    Restart the server in order for the bus to start working properly.

JMS Resources

  1. Go to Resources > JMS > JMS providers.

  2. In the scope field select the cell
    Click on the link 'Default Message Provider'
  3. Select 'Topic connection factories' (Resources > JMS > JMS Providers >Default messaging providers> Topic connection factories)
    Create a new topic connection factory.
    Name JNDI Name Bus name
    FndAdminTopicFactory jms/TopicFactory ifsbus
  4. Press OK and save your changes.

  5. Topics (Resources > JMS> JMS Providers >Default messaging provider > Topics)
    Press New
    Name JNDI Name Topic Name Bus name Topic space
    FndAdminTopic jms/FndAdminTopic FndAdminTopic ifsbus Default.Topic.Space
  6. Activation specifications (Resources > JMS> JMS Providers >Default messaging provider > Activation specifications)
    Create a new specification.
     

    Name JNDI Name Destination Type Destination JNDI Name Bus name Authentication Alias
    FndAdminTopicAS jms/FndAdminTopicAS Topic jms/FndAdminTopic ifsbus jmsuser
  7. Open wsadmin located in the bin folder in your profile home.
    Launch wsadmin with user name and password and optionally configure it to run jython as scripting language.
    Example:
      <profile_home>/bin/wsadmin -user wasAdmin -password wasAdmin -lang jython

      <profile_home>/bin/wsadmin -user wasAdmin -password wasAdmin


    When the wsadmin is launched run the following commands which will grant the group Everyone with access rights to send and receive messages to the JMS destination and topic.
    Jython:
      AdminTask.addGroupToDestinationRole(["-type", "TopicSpace", "-bus", "ifsbus", "-destination", "DefaultTopicSpace", "-role", "sender", "-group", "Everyone"])
      AdminTask.addGroupToDestinationRole(["-type", "TopicSpace", "-bus", "ifsbus", "-destination", "Default.Topic.Space", "-role", "receiver", "-group", "Everyone"])
      AdminTask.addGroupToTopicRole(["-bus", "ifsbus", "-topicSpace", "DefaultTopicSpace", "-topic", "FndAdminTopic", "-role", "sender", "-group", "Everyone"])
      AdminTask.addGroupToTopicRole(["-bus", "ifsbus", "-topicSpace", "DefaultTopicSpace", "-topic", "FndAdminTopic", "-role", "receiver", "-group", "Everyone"])
      AdminConfig.save()
    Jacl:
      $AdminTask addGroupToDestinationRole {-type TopicSpace -bus ifsbus -destination Default.Topic.Space -role sender -group Everyone}
      $AdminTask addGroupToDestinationRole {-type TopicSpace -bus ifsbus -destination Default.Topic.Space -role receiver -group Everyone}
      $AdminTask addGroupToTopicRole {-bus ifsbus -topicSpace Default.Topic.Space -topic FndAdminTopic -role sender -group Everyone}
      $AdminTask addGroupToTopicRole {-bus ifsbus -topicSpace Default.Topic.Space -topic FndAdminTopic -role receiver -group Everyone}
      $AdminConfig save.